
Norway Maple Tree Care
The Norway maple (Acer platanoides) is a popular tree species known for its hardy nature and adaptability to urban environments. This tree, indigenous to Western Asia and Europe, has swiftly spread throughout North America and grown to have a thick canopy. Despite its resilience, Norway maples require specific care and attention to thrive, particularly in urban settings where pollution, compacted soil, and space limitations can present challenges. Engaging a tree care expert ensures the tree remains healthy and continues to enhance the landscape for years to come. Key Takeaways: Professional pruning and disease management are essential: Regular pruning and disease prevention, performed by tree care experts, are vital to maintaining the health and longevity of Norway maples, preventing common issues like root damage and fungal infections. Urban environments present unique challenges for Norway maples: While these trees are resilient, compacted soil, pollution, and limited root space can hinder their growth. Regular inspections by arborists can help address these urban-specific concerns. Consistent maintenance enhances tree health: Norway maples benefit from ongoing care, including fertilization, watering, and pest control, which ensures their aesthetic value and longevity in both residential and urban landscapes. Identifying Norway Maple Trees Norway maples (Acer platanoides) are relatively easy to identify due to their distinctive physical characteristics: Leaves: The Norway maple’s leaves are broad, with five to seven lobes resembling those of other maple species. They are dark green on the upper side and lighter on the underside, turning golden yellow in autumn. A key identifier is the milky sap that oozes from the leaf stems when broken. Bark: Young Norway maple trees have smooth, gray bark, which becomes rougher and more furrowed as the tree matures. Its somewhat rectangular, plate-like ridges distinguish the bark from other maples. Growth Habits: Norway maples are fast-growing, capable of reaching heights of 40-60 feet, and have a comprehensive, dense, rounded canopy. Their ability to provide shade quickly makes them popular in urban settings. Common Misconceptions About Norway Maple Trees One common misconception is confusing the Norway maple with the sugar maple. While their leaves appear similar, the Norway maple’s broader leaves and milky sap distinguish them from sugar maples, which have clear sap. Additionally, some may mistake Norway maples for native North American maples, but Norway maples tend to have a more invasive root system and a shallower structure. How Care Needs Vary Based on the Tree’s Environment Norway maples are highly adaptable but respond differently to various environments. Due to pollution and compacted soil, urban areas may require more attention to soil quality and pruning. In natural or rural settings, they can thrive with less maintenance, although regular monitoring for pests and diseases remains essential. Trees planted in confined spaces, such as small yards or near sidewalks, need more frequent root management to prevent damage to structures. Common Issues Faced by Norway Maples Despite their hardiness, Norway maples face several challenges, especially in urban or densely populated areas. Addressing these issues through regular care and expert intervention is critical to maintaining a healthy tree. Root Problems Norway maples are known for their shallow, extensive root systems. These roots can cause significant damage to nearby sidewalks, driveways, and other hardscapes by pushing up the surface as they spread. Additionally, the shallow root structure makes them more susceptible to erosion, especially in areas with poor drainage or compacted soil. In urban environments, confined space can exacerbate root problems, making regular root pruning or barriers necessary to prevent damage. Disease Norway maples are particularly vulnerable to Verticillium wilt, a fungal disease that affects the tree’s vascular system. Symptoms include yellowing leaves, wilting, and premature leaf drop. The fungus can infiltrate the soil and interfere with water and nutrient flow, causing branch dieback and, in extreme situations, tree death. Other fungal infections, including tar spots, can also affect the leaves, but these usually pose more of a cosmetic problem than a health risk. Pest Control Norway maples, including aphids, mites, and scale insects, can attract pests. Aphids, in particular, are common pests that feed on the tree’s sap, curling leaves and stunting growth. These pests can also produce a sticky substance known as honeydew, which leads to sooty mold on the leaves. Regular inspection and treatment with horticultural oils or natural predators can help control pest populations. Environmental Stressors Norway maples in urban environments face additional stressors such as drought, pollution, and compacted soil. These factors weaken the tree, making it more susceptible to diseases and pests. Drought can cause leaf scorching and premature leaf drop, while urban pollution can interfere with photosynthesis. Roots struggle to absorb water and nutrients in compacted soil, leading to slow growth and poor overall health. Regular watering, mulching, and soil aeration are essential to combat these stressors. Essential Care Practices for Norway Maple Trees Norway maple trees are relatively low-maintenance but benefit from regular care to ensure long-term health and growth. Proper pruning, fertilization, watering, and mulching are critical to effective care. Pruning Techniques Norway maples require regular pruning to encourage strong development and guard against disease. These trees are best pruned in late fall or early winter when they are dormant. This minimizes the disease risk and allows the tree to focus on healing and regrowth in the spring. Pruning during this period helps: Remove dead or diseased branches. Thin out dense canopies to improve air circulation. Shape the tree and prevent overgrowth that can lead to structural weakness. Fertilization Norway maples benefit from fertilization, mainly when young or growing in nutrient-poor soil. An ideal balanced, slow-release fertilizer with a 10-10-10 or 20-20-20 ratio (Nitrogen-Phosphorus-Potassium) is perfect. Every year in the early spring, fertilizer should be fed to the tree to provide the nutrients it requires for the growing season. Fertilization can be less frequent for mature trees, but soil testing can help determine nutrient deficiencies. Watering Needs Watering plants correctly is essential, particularly in the early years after planting or during dry spells. Norway maples should be watered deeply, allowing the soil to absorb moisture
Bald-cypress Tree Pruning: The Complete Guide to Hiring a Professional Arborist
Bald Cypress trees are known for their appearance and ability to thrive in various conditions, particularly in swampy environments. However, like all trees, they require regular care to maintain their health and beauty. One aspect of tree care is pruning, which enhances the tree’s aesthetic appeal and supports its long-term vitality. Due to their height and unique growth patterns, professional pruning is essential for bald cypress trees. Hiring a skilled arborist ensures your tree remains strong, safe, and visually appealing. Key Takeaways: Pruning Promotes Tree Health: Professional pruning removes dead, diseased, or overgrown branches, ensuring the Bald Cypress tree stays healthy and robust and prevents breakage or decay. Safety and Expertise Matter: Bald Cypress trees can grow tall, making DIY pruning risky. Hiring a professional ensures the tree is pruned safely and correctly without harming the tree or surrounding property. Timing is Crucial for Best Results: The best time to prune Bald Cypress trees is during their dormant season, typically in late winter. Professional arborists know when and how to prune for optimal growth and long-term health. Why Prune Bald Cypress Trees? Pruning Bald Cypress trees is essential to their care, ensuring they remain healthy, well-shaped, and safe for their environment. Professional pruning provides several benefits that enhance the tree’s longevity and appearance while addressing practical concerns. Health: One of the primary reasons to prune a Bald Cypress tree is to remove dead, diseased, or damaged branches. These compromised branches can become a breeding ground for pests and diseases, which could spread to other parts of the tree or even to nearby plants. Removing these problematic branches prevents further damage and ensures the tree’s overall health. Regular pruning keeps the tree in its best condition and reduces the likelihood of decay or pest infestations. Growth Control: Bald Cypress trees can grow quite large, and proper management is necessary to develop unruly branches that can interfere with nearby structures or power lines, especially in urban settings. Pruning helps control the tree’s growth, shaping it for optimal health and safety. By removing or shortening overgrown branches, professionals can guide the tree’s development to ensure balance and stability, preventing future structural problems or hazards. Aesthetic Appeal: Another significant reason for pruning is to maintain the natural beauty of a Bald Cypress tree. These trees may provide a breathtaking focal point in a landscape with their distinctive, feathery foliage and towering presence. But if they don’t get regular care, they could grow out of control or become unbalanced. Pruning ensures that the tree keeps its natural shape and continues to be visually appealing and proportionate. This improves your yard’s or property’s overall visual appeal while enhancing the landscape’s charm and worth. Preventative Care: Trees can sustain severe damage during storms, high winds, or prolonged rain, particularly if they have many branches and leaves. Trimming a tree’s canopy to a thinner size can help lower the likelihood of storm damage by facilitating easier wind passage. Removing excess branches reduces the chances of breakage and lightens the load on the tree’s structure. This proactive care helps prevent costly damage to the tree and surrounding areas during harsh weather conditions. When to Prune Bald Cypress Trees Pruning Bald Cypress trees immediately ensures their health and proper growth. While these resilient trees can handle pruning well, knowing when to prune can significantly improve their recovery and long-term vitality. Best Times of the Year to Prune When Bald Cypress trees are dormant, typically at the end of winter or the beginning of spring, just before new growth begins, this is the ideal time to prune them. During this period, the tree is less active, and pruning causes less stress. Pruning in late winter helps the tree recover more quickly because it’s entering a phase of active growth soon afterward. This timing also allows the tree to heal its wounds more efficiently, minimizing the risk of disease or pest infestations. Season Pruning Recommendation Reason Late Winter (Dormant Season) Ideal Minimal stress, quick recovery, fewer pests/diseases. Early Spring Acceptable but not optimal Early growth may interfere with recovery. Summer Not recommended The tree is in total growth, increasing stress. Fall Not recommended The risk of disease is spread as the tree slows down. Avoiding the Growing Season Pruning is often not advised in the spring and summer but during the growing season. Stress can affect trees more when they are actively growing new leaves. Cutting branches during this period can sap the tree’s energy and lead to slower recovery or stunted growth. Additionally, pruning during the growing season can expose fresh wounds, attracting pests or spreading diseases more easily. Heavy pruning during these months should be avoided to prevent unnecessary harm. However, light trimming or removing small dead branches may be safe with care. Signs It’s Time to Prune Dead or Broken Branches: If you notice limbs that no longer produce leaves or are visibly damaged, it’s time to prune. Dead branches pose a risk of falling and can invite disease. Overgrowth: When the tree becomes dense with branches, particularly in its interior, it signifies that thinning may be necessary. Excessive overgrowth can prevent sunlight from reaching all parts of the tree and may affect its overall health. Structural Issues: Branches that grow at awkward angles or too close together can create weak points in the tree’s structure. To maintain balance and stability, these should be corrected through strategic pruning. Signs of Pruning Need Description Dead or Broken Branches Limbs with no leaves or visible damage. Overgrowth Thick branch density, blocking sunlight. Structural Issues Branches are crossing, rubbing, or growing unevenly. How Professional Arborists Prune Bald Cypress Trees Pruning a Bald Cypress tree requires expertise and precision to ensure the tree’s health, safety, and aesthetic appeal. Professional arborists are trained to use specific tools, techniques, and safety protocols to prune these trees effectively. They focus on maintaining the tree’s natural beauty while ensuring it grows healthily and safely. Tools and Techniques Used by Professionals Pruning shears: For smaller branches and
Bald Cypress in NYC Adapting a Southern Tree to Northern Climates
Adapting the Bald Cypress to NYC: A Guide to Growing Southern Trees in Northern Urban Landscapes The Bald Cypress is a unique tree native to the southern United States, most often associated with the swamps and wetlands of Louisiana and Florida. Known for its iconic “knees” and feathery foliage, it has recently become famous for urban areas far north of its original habitat, including cities like New York. While the Bald Cypress may seem unusual for such northern climates, this resilient tree has proven adaptable when given the right conditions. Bald Cypress trees offer several environmental benefits for urban settings like NYC, from flood control to improving air quality. This article explores how the Bald Cypress adapts to the northern climate of NYC, its benefits, and what care is needed to ensure its success in such an environment. Key Takeaways: Climate Adaptability: Despite being native to warm southern climates, the Bald Cypress can thrive in New York City’s colder USDA Zone 7. When correctly cared for, it shows resilience to winter conditions, especially in its early stages. Environmental Benefits: The Bald Cypress provides numerous ecological advantages in NYC, including improved air quality, enhanced stormwater management, and creating wildlife habitats, making it an excellent addition to urban landscapes. Urban Challenges: While the Bald Cypress can flourish in NYC, it faces challenges such as space constraints, soil quality, and the need for winter protection. Proper watering, pruning, and maintenance are crucial to the tree’s long-term success in northern urban areas. Characteristics of the Bald Cypress Appearance The Bald Cypress is a majestic tree with distinct features that make it stand out in natural and urban settings. Its overall appearance and seasonal changes make it a desirable tree for cityscapes like New York City. Conical Shape: The Bald Cypress has a distinctive pyramidal or conical shape, visually striking and functional in growth. Mature trees can grow up to 70 feet tall, providing ample shade and aesthetic appeal for parks, streets, and backyards. Foliage: The tree’s feathery, light-green foliage is one of its defining characteristics, lending a soft, elegant appearance in the spring and summer. In the fall, the foliage transforms dramatically, turning a rich orange-brown before shedding its needles, as the tree is a deciduous conifer. This seasonal needle drop is unusual for conifers; most retain their needles year-round. Deciduous Conifer: Unlike many evergreen conifers, the Bald Cypress sheds its needles in the winter. This unique trait allows the tree to conserve water and energy during the colder months, helping it adapt to diverse climates, including New York’s winter season. Adaptability The Bald Cypress is incredibly adaptable to various environmental conditions, which makes it well-suited for urban planting, particularly in places like NYC, where weather and soil conditions can be variable. Thrives in Wet, Swampy Environments: As a native of southern wetlands, the Bald Cypress is accustomed to areas prone to flooding and can flourish in saturated soils. It is often found in swamps and bayous, where other trees might struggle. Tolerant of Dry Soil: While it thrives in wet conditions, the Bald Cypress is also highly adaptable to dry soils once established. This versatility makes it a good candidate for areas with fluctuating water availability, such as urban environments that may experience periods of drought. Tolerant of Flooding, Drought, and Air Pollution: The tree’s tolerance to extreme conditions—including flooding, drought, and poor air quality—makes it an ideal species for urban environments like New York City. This tolerance ensures that it can withstand the challenges of city life, including pollution and stormwater runoff. Root System One of the Bald Cypress’s most fascinating and functional features is its root system, which is significant in its stability and adaptability. Deep Roots: The Bald Cypress develops a deep root system that anchors it firmly into the ground, even in areas prone to flooding or high winds. This root structure stabilizes the tree and helps it access nutrients and water deep in the soil, ensuring survival in adverse conditions. Knees (Pneumatophores): When grown in particularly saturated conditions, the Bald Cypress develops unique root structures called “knees” or pneumatophores. These root protrusions extend above the ground or waterline, allowing the tree to breathe in oxygen-depleted environments. While these knees are most commonly seen in swampy areas, they may still appear in less wet environments if the soil conditions are right. Key Characteristics of Bald Cypress Feature Details Height Up to 70 feet Shape Conical, pyramidal Foliage Feathery, light-green in summer; turns orange-brown in fall. Type Deciduous conifer (sheds needles in winter) Adaptability Thrives in both wet and dry soil; tolerates flooding, drought, and pollution Root System Deep roots for stability; knees (pneumatophores) in waterlogged conditions Climate Tolerance of the Bald Cypress The Bald Cypress is a tree known for its impressive adaptability to different climates. Although native to warm regions of the southern United States, this tree has shown remarkable resilience when grown in colder areas such as New York City. Understanding its origin and how it adjusts to colder climates like NYC is crucial for ensuring its successful growth in northern urban environments. Origin in Warm Climates Native to USDA Zones 5-9: The Bald Cypress is native to regions classified within USDA Hardiness Zones 5 through 9. These zones include mild winters and long, hot summers, providing ideal growing conditions for this species. Typically Found in Warm Southern Regions: The bald cypress is most commonly found in warm, wet areas like the bayous of Louisiana and Florida. In these regions, it thrives in swamps and along riverbanks, benefiting from high humidity levels and consistent access to water. Long Summers, Mild Winters: Bald Cypress trees grow best in regions that experience long, hot summers that fuel their growth and mild winters that don’t expose them to extreme cold. This explains their popularity in southern climates with low risk of frost or severe winter weather. Adapting to NYC’s Climate NYC Located in USDA Zone 7: New York City falls within USDA Hardiness Zone 7, a suitable environment for
Tree Surgeon vs. Arborist: What’s the Difference and Why It Matters

Trees are more than just elements of our landscape; they are vital to our ecosystem and contribute to the beauty and health of urban environments like New York City. When it comes to caring for trees, you might encounter two types of professionals: tree surgeons and arborists. While their roles may seem similar, they have distinct responsibilities and expertise. Defining the Roles: Tree Surgeon and Arborist What Is a Tree Surgeon? A tree surgeon, often referred to as a tree care technician, specializes in the physical maintenance and removal of trees. Their primary responsibilities include pruning, trimming, cutting down trees, and removing stumps. They are skilled in using equipment like chainsaws, cranes, and chippers to perform their tasks safely and efficiently. Tree surgeons are essential when you need to address immediate physical issues with your trees, such as removing dead or hazardous limbs or clearing fallen trees after a storm. What Is an Arborist? An arborist, on the other hand, is a professional trained in the science of arboriculture, which is the study of trees, shrubs, and other perennial woody plants. Arborists focus on the overall health, growth, and preservation of trees. They diagnose diseases, assess tree health, and develop comprehensive care plans to promote longevity and vitality. Services provided by arborists include soil analysis, pest management, fertilization, and strategic pruning to encourage healthy growth patterns. Education and Certification For Tree Surgeons and Arborists Tree Surgeons While formal education isn’t always required, many tree surgeons gain their skills through vocational training programs and on-the-job experience. They often hold certifications in specific skills like climbing and operating heavy machinery. Safety training is a critical component of their education due to the hazardous nature of their work. Arborists Arborists typically have a more extensive educational background in tree biology and ecology. Many hold degrees in forestry, horticulture, or environmental science. Professional arborists often seek certification from organizations like the International Society of Arboriculture (ISA), which requires passing comprehensive exams and committing to ongoing education. When to Hire a Tree Surgeon You should consider hiring a tree surgeon when: Immediate Removal Is Needed: If a tree poses a safety risk due to damage or disease, a tree surgeon can safely remove it. Pruning and Trimming: For aesthetic purposes or to remove obstructive branches, tree surgeons can perform precise cuts. Storm Damage Cleanup: After severe weather, they can clear fallen trees and debris promptly. When to Consult an Arborist You should consult an arborist when: Tree Health Assessment: If you’re concerned about the health of your trees, an arborist can diagnose issues and recommend treatments. Long-Term Care Plans: For ongoing maintenance and care, arborists can develop strategies to ensure your trees thrive. Planting and Transplanting: They advise on the best species to plant in specific locations and the proper techniques for transplanting. Why the Distinction Matters Choosing between a tree surgeon and an arborist depends on your specific needs. Hiring the right professional ensures that the job is done correctly and safely. For instance, employing a tree surgeon for tree removal without understanding the underlying health issues could lead to unnecessary costs or loss of valuable trees. Conversely, consulting an arborist when immediate physical work is required might delay urgent actions. Professional tree care helps to: Prevent Property Damage: Regular maintenance can prevent branches from damaging property or power lines. Promote Safety: Removing hazardous trees or limbs reduces the risk of injury to pedestrians and property. Enhance Property Value: Well-maintained trees can increase the value of your property and improve curb appeal. Support Urban Ecology: Healthy trees support local wildlife and contribute to a balanced ecosystem. Making the Right Choice for Your NYC Trees Before hiring a professional, assess your needs: Immediate Physical Work Needed? Consider a tree surgeon. Concerned About Tree Health? Consult an arborist. Both Physical Work and Health Assessment? You might benefit from a company that offers both services. Comparison of Tree Surgeon and Arborist Services Service Tree Surgeon Arborist Expertise Ideal For Cost Tree Removal Expertise in safe removal May consult but not primary role Tree removal, emergency situations $500 – $3000 Health Assessment Limited In-depth analysis and care plan Diagnosing diseases, health checks $100 – $500 Pruning and Trimming Structural trimming Health-focused pruning Reducing size, aesthetics $200 – $1000 Disease Treatment May remove diseased parts Comprehensive diagnosis and treatment Treating or preventing diseases $100 – $1000 depending on treatment Soil Management Not typically involved Expertise in soil health and care Fertilization, improving soil quality $100 – $500 depending on the service Contact Us for Expert Tree Care Services At NYC Tree Pro, we offer comprehensive tree care services tailored to your needs. Our team includes both skilled tree surgeons and certified arborists who work together to provide exceptional service. Whether you require immediate tree removal or a long-term care plan, we’re here to help. Contact us today to schedule a consultation.
Ailanthus Tree: Invasive Species Removal
Effective Strategies for Ailanthus Tree Removal: Protecting Native Ecosystems from Invasive Species The Ailanthus tree (Tree of Heaven) is a fast-growing invasive species that poses a significant threat to ecosystems in North America. Initially introduced for ornamental purposes, its aggressive spread and ability to thrive in disturbed soils have led it to dominate landscapes, outcompeting native plants. This affects biodiversity and attracts harmful pests, such as the spotted lanternfly. Proper removal of the Ailanthus tree is crucial for preserving native ecosystems and preventing further ecological damage. Key Takeaways: Aggressive Growth and Spread: The Ailanthus tree is known for its rapid growth and ability to reproduce quickly, making it highly invasive. Its aggressive nature allows it to outcompete native plants, significantly reducing biodiversity in affected areas. Chemical Warfare Against Native Plants: The Ailanthus tree has an advantage over native species because it releases allelopathic compounds that prevent the growth of the surrounding vegetation. Where Ailanthus is present, this chemical warfare makes it much more difficult for native plants to survive. Effective Removal Requires Persistence: Due to its strong ability to resprout from roots, removing Ailanthus trees is a long-term process. The most effective methods involve manual removal, herbicide application, and consistent monitoring over several years to prevent regrowth. Identifying Ailanthus Trees Physical Characteristics Identifying the Ailanthus tree (Tree of Heaven) is essential for early detection and removal to prevent its invasive spread. Here are the key physical characteristics: Large Compound Leaves: The leaves of the Ailanthus tree are one of its most distinctive features. Each leaf is a compound, meaning it comprises smaller leaflets. Typically, Ailanthus leaves consist of 11 to 25 leaflets arranged in pairs along the stem, with a larger terminal leaflet at the end. Smooth Bark with a Grayish Color: The bark of a young Ailanthus tree is soft and grayish, often compared to the skin of a cantaloupe. As the tree matures, the bark develops ridges and furrows but generally retains its gray tone. Strong, Unpleasant Odor from Crushed Leaves: One of the easiest ways to identify an Ailanthus tree is by crushing its leaves or twigs. When damaged, the tree emits a strong, unpleasant odor that has been compared to rancid peanut butter or cat urine. Clusters of Small Yellow-Green Flowers: Late spring brings small yellow-green flowers from Ailanthus trees. Although they are not very showy, these flowers grow in enormous quantities. In the summer, the flowers give way to clusters of seed pods, each containing a single seed. How to Differentiate from Native Trees Ailanthus trees can sometimes be mistaken for native species like sumac or black walnut, but there are some apparent differences: Sumac: While both trees have compound leaves, sumac leaves tend to have fewer leaflets (around 9-15) and lack the distinctive unpleasant odor of Ailanthus. Additionally, sumac produces bright red, conical clusters of fruit, unlike the flat seed pods of the Ailanthus. Black Walnut: Black walnut also has compound leaves, but its leaflets are smaller and more numerous (15-23 leaflets), with a distinct aroma that is more pleasant than Ailanthus. Black walnut trees have dark, rough bark, unlike young Ailanthus’s smooth, gray bark. Black walnuts also produce large, green fruit that is easily distinguishable from Ailanthus seed pods. Ecological Impact of Ailanthus Invasion Effects on Native Plants The potential of the Ailanthus tree to decrease biodiversity through a mechanism known as allelopathy makes it a severe danger to native plant species. The toxins that the tree releases into the soil prevent other plants—primarily native species—from growing and developing. These chemicals create a hostile environment for surrounding vegetation, reducing competition and allowing the Ailanthus tree to dominate. This suppression leads to a decline in native plant diversity, as fewer species can establish themselves or thrive in areas where Ailanthus is present. Over time, the aggressive spread of Ailanthus can create monocultures, further limiting the variety of plant life in an ecosystem. Impact on Wildlife The Ailanthus tree also negatively affects local wildlife, offering poor habitat and food resources for native fauna. Most native animals, birds, and insects are not adapted to using Ailanthus for food or shelter, making it a largely unproductive species in terms of ecosystem support. When Ailanthus displaces native plants that often offer food, cover, and nesting places, wildlife populations may suffer. Additionally, Ailanthus trees attract the spotted lanternfly, an invasive insect that feeds on many plants and further disrupts ecosystems by damaging crops and other trees. Soil and Water Impact Ailanthus trees are highly adaptable and thrive in disturbed soils, such as urban environments or areas with construction or land disruption. Their ability to colonize quickly in such conditions allows them to spread unchecked, often outcompeting native species that require more stable environments. Furthermore, the rapid growth of Ailanthus affects water usage and soil composition. The tree consumes large amounts of water, depriving native plants of essential resources. Over time, the chemical compounds released by Ailanthus can alter soil composition, making it less suitable for native species to recolonize even after Ailanthus removal. Methods of Ailanthus Tree Removal Manual Removal Manual removal is a standard method for tackling more minor infestations of Ailanthus trees, mainly when herbicides or machinery are not viable options. However, it requires careful attention to prevent resprouting. Steps for Cutting and Digging Out Trees: Cut the tree down using saws or pruning tools close to the ground, preferably during the tree’s dormant season (late fall to early winter). Use a shovel or pickaxe to dig out the root system, removing as much of the root as possible. Dispose of cut and dug materials to prevent regrowth. Best Practices for Smaller Infestations: Focus on young saplings, as their root systems are less extensive. Dig out lateral roots, as any remaining fragments can sprout new trees. Follow up with regular monitoring to catch any regrowth early. Caution: Resprouting Risk: Even small fragments of the root system can lead to new growth. To minimize this, ensure thorough root removal or pair manual removal with herbicide application on
Commonly Found Trees in Manhattan & Harlem
Concrete jungle where dreams are made of… and trees?! A vibrant tapestry of green life thrives amidst the towering buildings and bustling streets of Upper Manhattan and Harlem. These neighborhoods, rich in history and culture, also boast a surprising diversity of trees, both native and introduced, that add beauty, shade, and a touch of nature to the urban landscape. Join us on a virtual tree tour as we explore the resilient roots and leafy branches that make up this unique urban canopy. Native Trees: Resilient Roots in the City Native trees that have evolved and adapted to the local environment for centuries are the backbone of any healthy ecosystem. In the heart of the city, these resilient species provide invaluable benefits, from cleaning the air and reducing stormwater runoff to providing habitat for wildlife and enhancing our overall well-being. The London Planetree: With its distinctive peeling bark and large maple-like leaves, the London Planetree stands tall as an iconic symbol of urban resilience. Adaptable to harsh conditions, it thrives along busy streets, providing much-needed shade and filtering pollutants from the air. Often called the “lungs of the city,” these trees play a vital role in maintaining air quality and mitigating the urban heat island effect. A Splash of Red: As summer fades into autumn, the Red Maple sets the cityscape ablaze with its vibrant foliage. This adaptable native tree thrives in a variety of soils and adds a welcome burst of color to parks, streets, and backyards. Its winged seeds, or samaras, twirl gracefully in the wind, providing a delightful spectacle for nature enthusiasts of all ages. Graceful Foliage & Wildlife Haven: The Honeylocust, with its delicate, feathery leaves, casts a dappled shade that invites relaxation and contemplation. Its fragrant flowers attract pollinators, while its twisted seed pods provide sustenance for birds and small mammals. A Testament to Strength: Standing tall with its distinctive pyramidal shape, the Pin Oak is a majestic presence in parks and larger properties. Its deeply lobed leaves turn a fiery red in autumn, creating a breathtaking display against the urban skyline. The Pin Oak’s strong wood and deep root system make it a resilient survivor, weathering storms and providing a sense of stability amidst the hustle and bustle of city life. These native trees, and many others, are essential components of the urban ecosystem, providing countless benefits for both humans and wildlife. Introduced Species: A Mixed Blessing While native trees form the foundation of a healthy urban forest, introduced species also play a role in shaping the urban canopy. These trees, brought from other parts of the world, offer a mix of benefits and challenges, adding complexity and intrigue to the urban ecosystem. Abundant Shade, Ecological Concerns: The Norway Maple, with its dense, spreading canopy, provides ample shade and visual appeal. However, its shallow roots and prolific seed production can outcompete native species, reducing biodiversity and altering the forest understory. While its presence is undeniable, it’s important to be mindful of its potential ecological impact and strive for a balanced mix of tree species. Invasive, Yet Resilient: The Tree-of-Heaven, with its distinctive compound leaves and rapid growth, is a notorious invasive species. It can thrive in even the harshest urban environments, colonizing vacant lots and disturbed areas. While its aggressive nature poses a challenge, it also serves as a reminder of nature’s resilience and ability to adapt, even in the most unlikely of places. A Living Fossil: The Ginkgo, with its unique fan-shaped leaves and ancient lineage, is a living fossil, dating back millions of years. Its distinctive appearance and resilience to pollution make it a popular choice for urban plantings. A symbol of longevity and survival, the Ginkgo adds a touch of history and wonder to the cityscape. Introduced trees, like the Norway Maple, Tree-of-Heaven, and Ginkgo, offer a glimpse into the global tapestry of plant life and the complex interactions between humans and the natural world. While their presence can be controversial, they also contribute to the urban canopy’s diversity and remind us of the ever-evolving nature of ecosystems. Hidden Gems & Neighborhood Highlights Beyond the common and familiar, Upper Manhattan and Harlem harbor a treasure trove of hidden gems and unique tree species waiting to be discovered. From the majestic American Elm gracing the grounds of St. Nicholas Park to the fragrant blooms of the Eastern Redbud adorning community gardens, each neighborhood boasts its own arboreal delights. Tree-lined streets, such as the verdant canopy of Convent Avenue or the stately elms of Riverside Drive, offer a respite from the urban bustle and a chance to connect with nature. Parks like Marcus Garvey Park and Jackie Robinson Park provide a haven for both humans and wildlife, showcasing a diverse array of trees and fostering a sense of community. Exploring these neighborhoods with a keen eye for arboreal wonders can lead to unexpected discoveries and a deeper appreciation for the urban forest. Keep an eye out for the unusual bark of the Hackberry, the vibrant berries of the Serviceberry, or the delicate blossoms of the Flowering Dogwood. Each tree has a story to tell and a unique role to play in the vibrant tapestry of the urban ecosystem. Tree Service in Manhattan The urban forest of Upper Manhattan and Harlem thrives with the support of NYC Tree Pro. We’ve provided expert tree care services such as tree removal, trimming, pruning, topping, and emergency services for decades and we pride ourselves in excellent work and stellar customer service. Our service area includes the entirety of Manhattan and the Bronx including the harder to reach neighborhoods like Inwood, Fort George. We offer free onsite estimates and payment plans are available as well. Please call for more information.
Why Storms Can Uproot Even the Strongest Trees in NYC

New York City experiences its fair share of severe storms, from powerful nor’easters to intense summer thunderstorms. They cause significant damage to the city’s trees, sometimes even uprooting those that seem strong and healthy. Understanding why this happens and how you can protect your trees is crucial for maintaining the safety and beauty of your property. Factors That Make Trees Vulnerable Several factors can make trees more vulnerable to being uprooted during storms. 1. Root Health and Soil Conditions: The strength and health of a tree’s root system are critical to its ability to withstand strong winds. Trees with shallow or damaged roots are more susceptible to being uprooted. Poor soil conditions like compacted or waterlogged soil, can weaken the root system, making it easier for a storm to topple the tree. 2. Tree Species and Resilience: Different tree species have varying levels of resilience to wind and storm damage. For example, trees with deep root systems, like oaks, are generally more stable than those with shallow roots, like maples. However, even resilient species can become vulnerable if they are old, diseased, or improperly maintained. 3. Previous Damage or Disease: Trees that have suffered damage in previous storms or are affected by disease are more likely to be uprooted in the next big storm. Damage such as broken limbs, bark wounds, or decay weakens the tree’s structure, making it less stable. 4. Soil Saturation: Heavy rainfall can saturate the soil, reducing its ability to hold a tree’s roots in place. When the soil becomes waterlogged, it loses its grip, and even a relatively healthy tree can be uprooted by strong winds. 5. Urban Environment Factors: In urban areas like NYC, trees often grow in confined spaces with limited root spread, making them more vulnerable to storm damage. How Storms Uproot Trees Storms can uproot trees in several ways. High winds push against the tree’s canopy, creating a lever effect that pulls the roots out of the ground. If the soil is saturated from heavy rain, the roots may lose their grip, making it easier for the tree to topple. In some cases, the tree’s structure may already be compromised due to disease or previous damage, which further increases the likelihood of uprooting. The “domino effect” is another phenomenon where one fallen tree can cause nearby trees to uproot as well. This is particularly common in areas where trees are planted close together or in rows. How to Protect Trees from Storm Damage Regular Inspections by an Arborist: Regular check-ups can identify potential weaknesses in your trees, such as root damage, signs of disease, or structural issues. An arborist can recommend treatments or preventative measures to strengthen your trees before a storm hits. Proper Pruning and Care: Maintaining a balanced canopy and removing dead or weakened branches can reduce the risk of uprooting. Proper pruning techniques help to distribute weight evenly and reduce wind resistance, making the tree more stable. Installing Support Systems: For particularly vulnerable trees, installing cabling or bracing systems can provide additional support during storms. These systems help to stabilize the tree and prevent limbs from breaking or the trunk from splitting. Improving Soil Conditions: Ensuring that the soil around your trees is well-drained and not compacted can help to maintain root health and stability. Aerate the soil and add organic matter to improve its structure. Choosing the Right Species for Your Location: When planting new trees, select species that are well-suited to your specific environment. Trees with strong, deep root systems are generally more resistant to storm damage. Common Causes of Tree Uprooting During Storms Cause Explanation Prevention Impact on Trees Cost of Mitigation Weak Root System Poor soil, disease Regular health checks High risk of uprooting Varies, $100-$500 for root care Soil Saturation Heavy rain, poor drainage Improve soil drainage Increased risk of uprooting $200-$1000 for drainage solutions Wind Shear High winds during storms Proper tree positioning and pruning Can lead to complete tree failure $200-$600 for pruning Previous Damage Prior storm damage, decay Tree inspections, removal if needed Weakens tree structure $500-$2000 for removal Urban Constraints Limited root space, structures Strategic planting, root care Restricts growth, increases vulnerability $100-$500 for soil amendments Conclusion Storms can be unpredictable and devastating, even for the strongest trees. Understanding the factors that contribute to tree uprooting can help you take preventative measures to protect your property. Regular inspections, proper pruning, and soil management are all essential for maintaining the health and stability of your trees. If you’re concerned about the condition of your trees or want to prepare for the next storm, contact NYC Tree Pro for a professional assessment and expert advice.
Using Tree Pruning and Removal to Combat Spotted Lanternflies
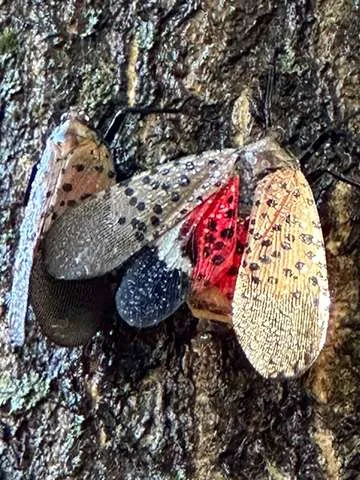
The spotted lanternfly is an invasive insect that has quickly spread across New York City, inflicting considerable harm to trees and plants. This pest presents a major risk to local ecosystems, especially since it targets numerous tree species. As a homeowner or property manager, it’s important to take proactive measures to safeguard your trees from this destructive insect. Two of the most effective ways to manage spotted lanternflies are through tree pruning and, in more severe cases, tree removal. Understanding Spotted Lanternflies The spotted lanternfly (Lycorma delicatula) is native to Southeast Asia but has become a major pest in the United States, particularly in the Northeast. It feeds on tree and plant sap, which weakens the host and makes it more susceptible to disease. The insect’s feeding habits leave behind a sticky substance called honeydew, which promotes the growth of sooty mold. This black, sooty mold not only damages the tree but can also cover outdoor surfaces, making it a nuisance for homeowners. The spotted lanternfly has a one-year life cycle, with adults laying eggs in the fall. Egg masses are found on tree trunks, branches, and even man-made structures. The eggs hatch in the spring, and the nymphs begin feeding on a variety of plants before becoming adults in late summer. Pruning as a Preventative Measure Pruning plays a vital role in managing spotted lanternflies, particularly in the early stages of infestation. By removing infested branches, you can reduce the population of lanternflies on your property and slow the spread of the insect to other trees. Focus on pruning branches that show signs of infestation, such as oozing sap, sooty mold, or egg masses. Additionally, pruning helps improve air circulation within the tree’s canopy, which can make the environment less hospitable for the pests. Regular pruning also allows you to monitor the health of your trees more closely. By inspecting your trees during pruning, you can catch early signs of spotted lanternfly activity and take action before the infestation becomes severe. When Removal is Necessary In some cases, pruning alone may not be enough to control a spotted lanternfly infestation, especially if the tree is heavily infested or already weakened by the pest. Tree removal may be necessary to prevent the lanternflies from spreading to other healthy trees on your property or in the surrounding area. Tree removal is a last resort but is sometimes the only effective way to protect the rest of your landscape. When deciding whether to remove a tree, consider the extent of the infestation, the health of the tree, and its value to your property. A certified arborist from NYC Tree Pro can assess the situation and recommend the best course of action. Signs of Spotted Lanternfly Infestation Sooty mold on trees: This black mold is a sign of honeydew excreted by the lanternflies. Oozing sap: Look for sap oozing from small wounds in the tree bark, a common indicator of infestation. Egg masses on tree trunks: These are usually grayish and can be found on the bark, making them easy to spot during pruning. Presence of adult lanternflies: Adults are about an inch long, with long gray wings and black spots with bright red inside, and they often congregate in large numbers. Wilting or yellowing leaves: This can indicate that the tree is under stress from the feeding activity of the lanternflies. Comparison of Pruning vs. Removal for Spotted Lanternfly Control Method Best Used When Benefits Costs Drawbacks Pruning Early stages of infestation Preserves tree health Lower cost, typically $100-$500 May not be sufficient for severe cases Removal Severe infestation, tree decline Prevents further spread Higher cost, typically $500-$2000 Loss of tree, environmental impact Combined Approach Moderate infestation Balances health and control Moderate cost, depending on extent Requires ongoing monitoring Chemical Treatment When combined with pruning Targets lanternflies directly Varies, $100-$300 per application Environmental concerns, effectiveness varies Monitoring & Maintenance After initial treatment Prevents re-infestation Ongoing cost, typically $100-$300 annually Requires regular inspections
The Challenges of Tree Trimming and Pruning in Tight NYC Spaces

Tree care in New York City presents unique challenges, particularly when it comes to trimming and pruning. The city’s densely packed buildings, narrow streets, and small backyards require a specialized approach to ensure that tree care is done safely and effectively. Navigating Tight Spaces One of the primary challenges of tree trimming in NYC is accessibility. Trees often grow in confined spaces, such as small backyards, along narrow streets, or close to buildings. This limited space can make it difficult to position ladders or bring in heavy equipment. Additionally, the proximity of buildings, vehicles, and power lines increases the risk of property damage or personal injury during tree trimming. To navigate these tight spaces, tree care professionals must be highly skilled and use specialized equipment designed for urban environments. Techniques such as rope and harness systems allow arborists to access hard-to-reach areas without the need for large machinery. This not only ensures safety but also minimizes disruption to the surrounding area. Techniques for Effective Trimming and Pruning in NYC Given the constraints of the urban environment, effective tree trimming and pruning require careful planning and execution. Here are some of the key techniques used by professionals: 1. Use of Pole Pruners and Compact Tools: In tight spaces, traditional saws and pruners may be too bulky to maneuver. Instead, arborists use pole pruners, which allow them to reach high branches without the need for a ladder. Compact chainsaws and hand pruners are also essential for making precise cuts in confined areas. 2. Strategic Pruning: When trimming trees in urban areas, the goal is often to reduce the tree’s size while maintaining its health and aesthetics. Strategic pruning involves selectively removing branches to thin the canopy, reduce wind resistance, and prevent overgrowth. This technique helps to keep the tree balanced and reduces the risk of storm damage. 3. Cabling and Bracing: For trees that are at risk of splitting or losing limbs due to their location, cabling and bracing can provide additional support and involve installing flexible cables or rigid braces within the tree to stabilize its structure and reduce the likelihood of branch failure. 4. Minimizing Disruption: In NYC, tree trimming often takes place in busy residential or commercial areas. To minimize disruption, arborists may schedule work during off-peak hours or use noise-reducing equipment. They also take care to protect nearby structures and landscaping from debris and damage. 5. Safety Precautions: Arborists use personal protective equipment (PPE) such as helmets, gloves, and eye protection to reduce the risk of injury. They also ensure that the work area is secured and that all equipment is in good working order. Common Risks When Trimming Trees in Tight Spaces Damage to Property: Improper trimming techniques can lead to branches falling on nearby buildings, vehicles, or power lines, causing significant damage. Injury to Workers or Bystanders: Tight spaces increase the risk of injury, making it essential for workers to be highly trained and to use proper safety equipment. Harm to the Tree: Without the right techniques, pruning in tight spaces can stress the tree, leading to poor health or even death. Disruption to the Surrounding Area: Tree trimming in urban areas can be disruptive to residents and businesses, particularly if noise levels are high or debris is not properly managed. Legal and Regulatory Issues: In NYC, tree trimming may be subject to local regulations, particularly if the tree is on public property or if the work affects nearby buildings. Private property there is no need for a permit. Specialized Tools for Urban Tree Care Tool Use Benefit Ideal for Cost Pole Pruners Reaching high branches in tight spots Precision without ladder use Narrow spaces, high branches $40 – $100 Compact Chainsaws Cutting larger branches in confined areas Effective without taking up space Larger branches, confined areas $100 – $300 Rope and Harness Safe positioning for tree workers Ensures safety in precarious locations High, inaccessible branches $150 – $300 Hand Pruners Precise cutting of small branches Ideal for detail work Small branches, tight spots $20 – $50 Noise-Reducing Chainsaws Cutting branches in urban areas Minimizes disruption Urban environments, close to residents $200 – $500 Conclusion Tree trimming and pruning in NYC’s tight spaces require a specialized approach that balances safety, efficiency, and the health of the tree. By using the right techniques and equipment, professionals can navigate the challenges of urban tree care while minimizing disruption to the surrounding area. If you have trees that need trimming or pruning in a confined space, contact NYC Tree Pro for expert services. Our team is equipped to handle even the most challenging tree care tasks, ensuring your trees remain healthy and your property remains safe.
How to Trim a Mulberry Tree

Mulberry trees grow quickly and have beautiful foliage, and delicious fruit. To keep these trees thriving, regular pruning is essential. Whether your goal is to shape the tree, control its size, or enhance fruit production, proper pruning will ensure your tree remains healthy and productive. In this guide, we’ll take you step-by-step through the best methods for trimming a mulberry tree, including timing, techniques, and aftercare. Why Pruning Your Mulberry Tree is Important Pruning serves several critical purposes for mulberry trees: Promoting Tree Health: Pruning removes dead or diseased branches, which can reduce the risk of infections and encouraging healthy growth. Controlling Size: Mulberry trees grow quickly and can become quite large if left unchecked. Regular pruning keeps the tree at a manageable size for your garden or yard. Boosting Fruit Production: For fruit-bearing varieties, proper pruning ensures an abundance of accessible fruit. Shaping: In some cases, pruning is done for aesthetic reasons, such as maintaining a desired shape or form. When is the Best Time to Prune a Mulberry Tree? Major Pruning in Late Winter The best time for heavy pruning is during the tree’s dormant phase, typically in late winter, just before the new growth starts in the spring. Pruning during dormancy reduces sap loss and allows the tree to heal more efficiently. It’s also a good time to see the tree’s structure clearly without foliage obstructing your view. Light Pruning in Early Summer If your tree has excessive growth, you can perform some light pruning in early summer to maintain its size. Be cautious about cutting larger branches, though, as mulberries can struggle to heal these wounds during the active growing season. Beware of Sap Bleeding Mulberry trees are known to bleed sap from pruning wounds, especially if pruned outside of the dormant season. While sap bleeding isn’t harmful to the tree, it can be unsightly and may cause irritation if it gets on your skin. Essential Tools and Pruning Techniques Before you start pruning, make sure you have the right tools on hand: Tool Use Importance Best for Cost Pruning Shears Cutting small branches Ensures clean cuts to prevent damage Thin, young branches $20 – $40 Loppers Cutting thicker branches Necessary for larger branches Medium to large branches $30 – $60 Ladder Reaching higher branches Ensures safety and accessibility High branches and hard-to-reach areas $80 – $150 Gloves Protecting hands from cuts and sap Prevents injuries All types of branches $10 – $20 Safety Goggles Protecting eyes from debris Prevents eye injuries When cutting branches above the head $10 – $20 Hand Pruners: Best for small branches under 1 inch thick. Loppers: Ideal for branches that are 1-2 inches in diameter. Pruning Saw: For thicker branches that are over 2 inches in diameter. Sterilizing Agent: Always clean tools before and after pruning to prevent diseases from spreading between plants. Avoid Cutting Large Branches It’s best to avoid removing large branches (greater than 2 inches in diameter) as mulberry trees are slow to heal from large wounds, making them more susceptible to pests and infections. Step-by-Step Pruning Instructions Step 1: Remove Dead or Damaged Branches Begin by cutting away any branches that are dead, diseased, or damaged. This will enhance the tree’s overall health and reduce the risk of disease spreading. Make sure to cut back to healthy wood, leaving the branch collar intact to promote healing. Step 2: Remove Crossing and Inward-Growing Branches Branches that cross or grow inward towards the center of the tree should be pruned. These can crowd the tree, reduce airflow, and cause branches to rub against each other, which may lead to wounds and disease. Keep the canopy open to encourage better air circulation and sunlight exposure. Step 3: Shape the Tree for Light and Airflow When shaping the tree, focus on creating an open, vase-like structure with good spacing between branches. This allows light and air to reach the interior of the tree, which is especially important for fruit-bearing trees as it helps reduce the likelihood of disease and promotes even ripening of fruit. Step 4: Prune to Control Size If your tree is becoming too tall or wide, carefully trim back the larger branches to a manageable size. When pruning for fruit production, remember that mulberry trees bear fruit on last year’s growth, so be mindful not to over-prune and remove too many fruit-bearing branches. Advanced Pruning Techniques Pruning for Maximum Fruit Production Mulberries produce fruit on wood that grew the previous year, so pruning needs to be done carefully to preserve these branches. Here are some tips: Remove any dead or damaged wood first. Thin out branches to improve light penetration and air circulation. Lightly prune lateral branches, but ensure enough of the previous year’s growth remains to encourage fruit production. Consider creating a “harvesting notch” by pruning specific areas to make fruit more accessible. Pollarding for Shape Control Pollarding is a technique used to maintain a specific shape or control the height of your tree by regularly removing new growth back to the larger framework branches. This method should be started when the tree is young and requires consistent pruning to maintain. If done improperly, pollarding can weaken the tree and make it vulnerable to disease, so proceed with caution. Common Pruning Mistakes to Avoid Over-pruning: Taking off too much of the tree can reduce its vigor and fruit yield, particularly if you remove too much of last year’s growth. Topping: Avoid cutting the top of the tree, as this encourages weak regrowth and can damage the tree’s structure. Pruning Large Branches: Large cuts heal slowly and may leave the tree susceptible to pests and disease. Try to avoid pruning branches over 2 inches in diameter. Aftercare for Your Mulberry Tree Once you’ve finished pruning, your tree may need a bit of extra care: Monitor for Sap Bleeding: If you pruned outside of the dormant season, it’s normal to see some sap bleeding. This usually stops on its own, but monitor the tree to ensure the